

 Ever wanted to know how to use your Pillsbury refrigerated products for more than their basic use? Yesterday morning, I made these biscuit cups before we headed off to the beach. These biscuit cups are great because they are easy to make and have an easy cleanup process. I changed the original recipe up slightly but not by much.
 INGREDIENTS
Real Bacon Crumbles (I used about half of a 2.5 ounce bag. You can always cook bacon you have at home. If you do, I'd cook about 6 slices.)
Real Bacon Crumbles (I used about half of a 2.5 ounce bag. You can always cook bacon you have at home. If you do, I'd cook about 6 slices.)
1 package (8 oz) cream cheese, softened
2 tablespoons milk
2 tablespoons milk
2 eggs
1/2 cup shredded Swiss cheese (2 oz)
2 tablespoons chopped green onions (2 medium)
2 cans Pillsbury® Grands! Reduced Fat Buttermilk refrigerated biscuits
1/2 cup shredded Swiss cheese (2 oz)
2 tablespoons chopped green onions (2 medium)
2 cans Pillsbury® Grands! Reduced Fat Buttermilk refrigerated biscuits
Extra bacon crubles for topping
Extra Swiss cheese for topping
 Heat oven to 375°F. Spray regular-size muffin pan with cooking spray. Meanwhile, in small bowl, beat cream cheese until smooth. Gradually add milk and eggs, beating at low speed until smooth.
Stir in Swiss cheese and onions. Set aside.
Open biscuit cans, and press or roll each to form 5-inch rounds. Place 1 biscuit round in each muffin cup; firmly press in bottom and up sides, forming 1/4-inch rim. Place half of bacon in bottom of dough-lined muffin cups. Spoon cheese mixture evenly into cups.
 Bake 21 to 26 minutes or until filling is set and edges of biscuit cups are golden brown. Everyone's oven varies, so keep an eye on these.
 Bake 21 to 26 minutes or until filling is set and edges of biscuit cups are golden brown. Everyone's oven varies, so keep an eye on these.
Sprinkle each with bacon and more shredded Swiss chese; lightly press into filling. For garnishing, cut some additional 1" slanted green onions and top them on the biscuit cups. Remove biscuit cups from pan.

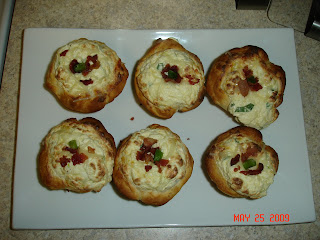


These are delicious! Here's the original recipe from the Pillsbury website for the Bacon Quiche Biscuit Cups. I'm off to eat the leftovers because they are so yummy!
 Don't these look delicious?!
 I loved that I learned how much easier it is to roll out sugar cookie dough if you do the following:


 We really are trying to use up some stuff that we have in our