Showing posts with label Cake. Show all posts

Monday, January 3, 2011

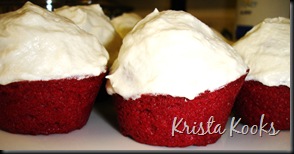
Gluten-Free Southern Red Velvet Cake

Again, I leave the Krista Kooks readers hanging.  So sorry!  Life is crazy busy these days.  I’ve so missed being able to blog about the culinary delights that are created in this household Smile

While I would love to be able to eat the fabulous Red Velvet Cake I’ve previously blogged about, a recent diagnosis of Celiac Disease has led me to search for new recipes, including my favorite cake - Red Velvet!October 2010 066
I loved tasting and consuming this cake as it made me realize that I won’t be missing out on ANYTHING with this diagnosis.  Don’t let the types of flour scare you; this is no different than tossing all-purpose flour in with other ingredients.

Cake Ingredients:

1 3/4 c. canola oil
1 1/2 c. sugar
2 eggs, beaten (room temp)
1 c. brown rice flour
3/4 c. sorghum flour
3/4 c. tapioca starch
1 tsp. baking soda
1 tsp. xanthan gum
1/4 tsp. salt
1 c. buttermilk (or 1 Tbsp cider vinegar and 1 c. milk substitute)
1 tsp. vanilla
1 oz. red food coloring (this is one of the McCormick’s bottles)
1 Tbsp. cocoa

Frosting Ingredients:
1 box confectioner’s sugar
8 oz. cream cheese (can sub vegan cream cheese)
1 stick butter (room temp)
1 c. chopped nuts (optional)
1 tsp vanilla Cake Instructions:
Preheat the oven to 350 degrees F.

Use a mixer to cream oil and sugar. With the mixer still going, add one egg at a time and beat until the eggs are thoroughly incorporated. (This step creates an emulsion that holds the batter together)

Mix all of the dry ingredients together in a separate bowl. Make sure they are well mixed, either by sifting the flours or whisking them.

Add the flour to the oil and sugar mixture in four parts. Alternate the flour with the buttermilk. You should begin and end with dry ingredients and each part should be mixed in completely before you add the next. (If you were to start with the liquids the emulsion would break.)

Make a paste of the cocoa, red food coloring, and vanilla and gently stir it into the batter.
Pour the batter into two greased and floured round cake pans. Bake at 350 degrees F for approximately 25 minutes. (A toothpick stuck into the middle of the cake should come out clean when the cake is done)

When the cakes have completely cooled, frost with Cream Cheese Frosting.

Frosting Instructions:
Cream the confectioner’s sugar, cream cheese, and butter.
Mix in the vanilla and chopped nuts.
Spread over cooled cake.
October 2010 061

Wednesday, June 2, 2010

Diet Soda Cake

Diet Soda Cake 3
Oh wow!  I can now have cake without so much guilt!  Thank you to Gina for sharing this lovely secret to your everyday box cake :)  Find your favorite diet soda, 2 egg whites, your favorite boxed cake, and your done!  How incredibly simple. 

Because I love the taste of Dr. Pepper, I was determined to make this cake with Diet Dr. Pepper.  The sous chef and I loved the flavor of this cake, no frosting/icing needed, and the egg whites really made it light and fluffy.  Highly recommend this quick and easy dessert!

Ingredients
1 boxed cake of your preference
2 egg whites
10 ounces of diet soda (your choice)

Directions
Preheat oven according to box directions. Spray pan of your choice according to box directions.

Beat cake mix, diet soda and egg whites. Pour into pan.

Bake as directed on box, or until toothpick comes out clean when inserted.
Let cake cool about 10 minutes before cutting.
Diet Soda Cake 6

Wednesday, May 5, 2010

Mother’s Day 2010

It’s time to honor Mom!  How are you planning to dine with Mom this Sunday?  Is this your first reminder that Mother’s Day is THIS weekend?  If so, I hope I can help you get ready :)  Here’s some ideas from Krista Kooks to help you enjoy time with Mom at home.  Click on any of the pictures to be directed to the original blog post.Krista Kooks Blueberry Delight 4 Blueberry Delight-Great for breakfast or brunch with Mom.Memorial Day 09 007 Bacon Quiche Biscuit Cups- Also great for breakfast or brunch.

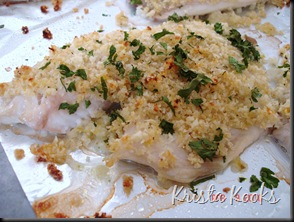
Krista Kooks Fish Oreganata 4Fish Oreganata- Perfect main dish for a light lunch with Mom.Krista Kooks Roasted Broccoli 4Roasted Vegetables-Use this preparation method for your favorite vegetable.

Paprika Parsley PotatoesParsley-Paprika Potatoes- Delicious compliment to the 2 above.Ziti    Spring Summer Ziti-Just make a simple pasta to share with Mom.June 2009 013Fruit Cookie Pizza- Help Mom keep it light for dessert with this fruit cookie pizza!

Whatever you do, I hope you have a great Mother’s Day with Mom!

Monday, April 19, 2010

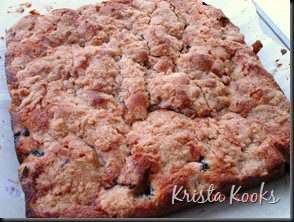
Blueberry Delight

Many many months ago, the sous chef and I were staying with our sweet friends Mike and Cynthia.K&HR-375Being the perfect hostess that she is, Cynthia made a fabulous breakfast.  I’ve been wanting to make that thing for months!  Cynthia was kind enough to share the recipe with me and allow me to share it with you :)Krista Kooks Blueberry Delight 4 This Blueberry Delight is absolutely heavenly, and it’s even easier than making blueberry muffins.  That said, I’m confident that these can easily be made in blueberry form much the same way a cake can be make as a cake or cupcakes.

Ingredients:

1/2 cup butter, softened to room temperature
1 egg
1 cup sugar
1/2 teaspoon kosher salt
1 1/2 cup all-purpose flour
2 teaspoons baking powder
1/2 cup milk
2 cups fresh or frozen blueberries

Cream butter, egg, sugar and salt until fluffy. Combine flour & baking powder; add to creamed mixture slowly.  Slowly add milk,  mixing well. Add blueberries & pour into greased/floured square pan.

Krista Kooks used a 9x9 square pan and lined it with parchement paper, no greasing required.  Being able to lift the cake out of the pan shortly after removing it from the oven was nice, thanks to the parchment paper.  I could eat it faster! :)

Topping

1/2 cup sugar
1/3 cup all-purpose flour
1/2 teaspoon cinnamon
1/4 cup softened butter

Combine all 4 ingredients & place on top of batter. Bake at 350 degrees for 35-45 minutes.
Krista Kooks Blueberry DelightKrista Kooks Blueberry Delight 2 Krista Kooks Blueberry Delight 3

Monday, February 1, 2010

Chocolate Chip Peanut Butter Cake

It doesn't happen very often, but I was really craving a cake recently. I wasn't interested in heading to the store for any ingredients. I just wanted a basic cake with some creamy frosting. I was confident I could find something I liked to match those cravings!
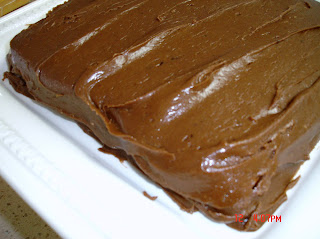
I did find a tasty recipe on Dinner & Dessert for this Chocolate Peanut Butter Cake, and I had everything on hand to make it! From the sound of the ingredients, I knew it would very very rich, and that's exactly what I was looking for.
As mentioned on Dinner & Dessert, there was not enough batter in this recipe to spread across three 9x2 pans, so I decided to just put this in one 8x8 pan.

2 ounces unsalted butter
1 cup all purpose flour
1/4 teaspoons baking soda
1/4 teaspoons baking powder
1/4 teaspoons salt
1/2 cup tightly packed brown sugar
3 ounces creamy peanut butter
1 large egg
1 egg yolk
1/4 cup sour cream
1/4 cup hot water
1/2 tsp pure vanilla extract
1/2 cup peanut butter chips or chocolate chips

Preheat oven to 325F.
Grease two 9 x 1 1/2 inch pans. Line your bottoms with parchment. Set aside.
Combine flour, baking powder, baking soda, and salt.
Mix together brown sugar, peanut butter and butter for two minutes. Add egg and egg yolk and mix for another 2 minutes. Scrape down the sides and mix for another minute.

Add half of the flour mixture and mix until incorporated about 20 seconds. Then add the sour cream, mixing again for 20 seconds. Gradually add the remaining flour mixture. Add the hot water in a slow, steady stream and mix on low to combine, about 30 seconds. Add the vanilla and mix for another 10 seconds. Add the peanut butter chips and use a rubber spatula to finish mixing the ingredients until thoroughly combined.

Divide the cake batter into the prepared pans, spreading it evenly. Bake for about 22 minutes. If you have 4 inch diameter tart pans like I used, it takes the same amount of time to bake the cake, if not a few more minutes. Use a knife to see if it is done.

Frost tops and sides of cake with frosting.

Chocolate Peanut Butter
Frosting Source: adapted from CD Kitchen

1/2 cup butter
1/4 cup milk
2 tablespoons milk
1/4 cup cocoa
16 ounces powdered sugar
1 teaspoon vanilla extract
1/4 cup peanut butter

Directions:

Combine butter, milk, and cocoa in a saucepan; bring to a boil, stirring constantly. Remove from heat. Add remaining ingredients; beat at medium speed of an electric mixer until smooth.

My sous chef and I also shared this with a couple of friends, and we all thought it was delicious! Granted, as I mentioned, this is extremely rich, so this cake goes a long way. You don't need a large piece to satisfy your appetite, but it is certainly delicious!

Friday, August 28, 2009

Lemon Curd Pound Cake

Yum!

Ok, so, I know 'curd' doesn't sound all that appetizing, but if you like Lemon Bars, it's the SAME thing, I promise. Very tasty! I'm not one that loves pound cake, but something about this recipe caught my eye. It might have something to do with the fact that I had most of the ingredients ;)
My best friend (and adopt-a-sister ;) ), Kelly, gave me this cookbook for my birthday. I'm finally getting to making something from it, and this is the first recipe I chose!

Wait to prepare the Lemon Curd until the cake comes out of the oven so it will still be warm when spread over the cake.

Makes 10 to 12 servings

Ingredients
1 cup butter, softened
1/2 cup shortening
3 cups sugar
6 large eggs
3 cups all-purpose flour
1/2 teaspoon baking powder
1/8 teaspoon salt
1 cup milk
1 teaspoon vanilla extract
1 teaspoon lemon extract

Beat butter and shortening at medium speed with an electric mixer until creamy. Gradually add sugar, beating at medium speed until light and fluffy. Add eggs, 1 at a time, beating just until the yellow yolk disappears.
Sift together flour, baking powder, and salt; add to butter mixture alternately with milk, beginning and ending with flour mixture. Beat batter at low speed just until blended after each addition. Stir in vanilla and lemon extracts. Pour batter into a greased and floured 12-cup tube pan.
Bake at 325° for 1 hour and 30 minutes or until a long wooden pick inserted in center of cake comes out clean. Cool in pan on a wire rack 10 to 15 minutes. Remove from pan; carefully brush Lemon Curd over top and sides of cake. Cool completely on wire rack.

Lemon Curd

2/3 cup sugar
1 1/2 tablespoons butter, melted
2 teaspoons grated lemon rind
2 tablespoons fresh lemon juice
1 large egg, lightly beaten


Stir together first 4 ingredients in a small, heavy saucepan; add egg, stirring until blended.
Cook mixture, stirring constantly, over low heat, 10 to 12 minutes or until mixture thickens slightly (cooked mixture will have a thickness similar to unwhipped whipping cream) and begins to bubble around the edges. Remove from heat. (The curd should be brushed immediately over cake, as mixture will continue to thicken as it cools.)


Doesn't this look delicious?! Grab a glass of milk and dive in :)
I had some additional batter that I made some mini-bundts with :)
If you'd like, you can follow along with the recipe here.

Monday, May 18, 2009

Texas Sheet Cake

One of my great aunts makes a chocolate sheet cake every Thanksgiving, and it's gone before the Turkey hits the table! Yes, that means the dessert is gone before the main course :)

Now, many have tried to replicate her recipe and do as well as she can, but no one ever thinks those cakes are as good as my great aunt's. That said, I wasn't going to try to replicate her cake; I didn't even try to ask for the recipe! I do have a Dessert cookbook from Cooking Light that has this Texas Sheet Cake recipe. It looked really tasty, so I decided to make it. I mean just look at the batter!
Yum!

Now, in the recipe, you'll notice that it says you can use a 13x9 if you don't have a jelly roll pan. Obviously you can see that I did that as I don't have a jelly roll pan that is big enough.

I took this cake to my cousin's graduation party on Sunday, and I think it was gone in 15 minutes! I did eat a small slice, and I was very impressed by how moist it was. You really should make this cake and make sure you put the icing on while the cake is hot!

Sunday, April 26, 2009

Chocolate Chip Cookie Dough Mini Cheesecakes

Yet another creative dessert from Krista Kooks! Well, that’s not entirely true; I actually go this recipe from CooksRecipes.com. All I really did to change it up was make them mini cheesecakes as opposed to one regular sized cheesecake. Thanks to my Mini Cheesecake Pan from Williams Sonoma, I was able to create this little bites of heaven! I mean, don’t you want to hold a piece of cheesecake, bite into the center, and then be surprised with warm chocolate chip cookie dough in the center? If you don’t, you must be one of those people that doesn’t like chocolate, in which case I will forgive you.


Another little creative idea that I did with these mini cheesecakes was to alter the crust ever so slightly. Normally, as you might know, when making a cheesecake, you use crumbled graham cracker crumbs, butter, and sugar. Now, I know these yummy cookies we all love called Oreos, and those little oreos are just the right size for the base of a mini cheesecake. So, rather than mix the crumbs, butter, and sugar, I choose to have fun twisting open oreos, scraping the cream off, and using the cookies as the base for my mini cheesecakes! I also melt about a tablespoon or two of butter and drizzle a few drops over each cookie once they are placed into the mini cheesecake pan.


After this cookie bottom process is complete, I proceed with making the cheesecake filling and chocolate chip cookie dough mix for the cheesecakes. You can view this recipe to see the original.
Having made these yummy little bites and several other cheesecakes, I’m beginning to wonder if I might be able to come up with my own cheesecake recipe that perhaps doesn’t use a full 3 8 oz. packages of cream cheese. I know there are recipes out there that use sour cream that seems to replace some of the cream cheese. So I ask this question for anyone who might have some sort of answer: is there some ratio or proportion to follow when replacing cream cheese with sour cream? Are there rules that make this process easier? Enlighten me, please!

Thursday, April 23, 2009

Graduation Cupcakes Recap

So, Graduations are coming around the corner again, and I wanted to take a look back at post that I helped you all out with a few months ago; Graduation Cupcakes.

There are probably different types of chocolate or other types of candy that you can use as your cupcake topper, but I explain in the post how you can create the ones I made.  It also might be easier now for any of you who might be needing a white graduation cap on top of your cupcake as Ghirardelli is now making White Chocolate Squares!  I saw them at Bed, Bath & Beyond one day :)

In these times of recession, save money for graduation and show you care by making your graduate these yummy cupcakes!

Saturday, January 3, 2009

Graduation Cupcakes

Henry's sister, Emily, graduated this December, and I knew there had to be some sort of celebratory goodie! Since I can't get enough of the red velvet cake recipe, I decided to make her some cupcakes using the same recipe. Though they weren't exactly the hit I had hoped, the idea behind them was pretty cool.


The cupcakes and the icing are the same as the previous red velvet cake recipe, but I added a few things on top! As you can probably tell from the picture above, I added graduation hats on top. These hats are 100% edible and really yummy! I got the chocolate squares from Ghirardelli using the dark chocolate mint and milk chocolate squares.
Underneath those chocolate squares are Reese's peanut butter cups that are turned upside down.

As you can see, I used a dollop of icing to secure the chocolate square to the peanut butter cup. On top of the chocolate square, I used a Dr. Pepper Jelly Belly since that jelly belly was the most maroon looking jelly belly to match Texas A&M! I also used a small amount of icing and died it yellow to create the tassle on each of the chocolate squares.

The result came out better than I thought, and it was a lot of fun to make them!

Cake Pops

I can't stop making this yummy red velvet cake! After discovering a very exciting baking blog, Bakerella, I decided I had to try making her Cake Pops. I followed her directions on how she makes her Cake Pops. A co-worker at work was having a birthday, so I thought this would be a fun treat in the office.


Basically, your taking a baked cake, crumbling it up, adding icing, and forming the mixture into cake balls that are added to skewers or some type of stick to create the pop. It's funny when you decide to make it with red velvet cake; the mixture ends up looking like ground meat!
After they are made, they look like the picture below. I didn't exactly use the right type of chocolate as I should have, but if you look through the Bakerella blog, you can see how wonderful these guys can look! My picture isn't all that fantastic either.

Friday, November 28, 2008

Red Velvet Cake

For as long as I have been cooking, I've always wanted to make a red velvet cake that was actually good! I tried once before...a loooong time ago...but I remember not having enough red dye to make the cake RED velvet.

Well, several weeks ago, I was browsing the food net work site and found a great Red Velvet Cake recipe that I thought would be great to try. I figured if it was on their website, it had to be delicious!Red Velvet Cake As I started making this cake, I had to get my taste tester/helper to run to the store for a few more ingredients :) Thanks hubby! I knew I had not used my little tube of red food coloring that comes in the pack with the four colors, but I also knew that the tube wouldn't be enough for the 2 tablespoons plus 2 teaspoons that the recipe requires. I mean, that's a lot of red dye! Smart guy that he is, he found the bottle of red food coloring that Adam's makes which is large for red food coloring. The big bottle did the trick, and you can see that the batter is REALLY RED! My favorite color :)Red Velvet Cake 2 There was so much batter than what I expected, so the extra batter was made into cupcakes. These were the first out of the even. They look so pretty and RED!Red Velvet Cake 3 Finally I got to frost the cupcakes. I love the way the way finishes off the red! If only I had say..a black dot to put on top?!Red Velvet Cake 4 Red Velvet Cake 5 The cake finally came out of the oven and got a thick bit of frosting as well! We haven't cut into that yet, but I'm sure it's the same as the cupcakes.Red Velvet Cake 6  Oh wow! The inside looks so moist and delicious. I'm curious if it tastes good?Fall 2008 61 I guess so!

Ingredients

For the cupcakes/cake:
15 1/2 ounces all-purpose flour
1 1/4 teaspoons baking soda
1 1/4 teaspoons salt
1 1/4 teaspoons unsweetened cocoa powder
1 1/2 cups vegetable oil
13 ounces granulated sugar
1 1/4 cups buttermilk
3 eggs
2 tablespoons plus 2 teaspoons red food coloring
1 1/4 teaspoons vinegar (white or apple cider can both work)
1 1/4 teaspoons vanilla extract
1/8 cup water
For the cream cheese frosting:
1 1/2 pounds cream cheese, room temperature
1 pound butter, room temperature
2 pounds powdered sugar, sifted
1 tablespoon vanilla extract
Directions
For the cupcakes/cake:
Preheat oven 350 degrees F.
Sift together flour, baking soda, salt, and cocoa powder into a bowl and set aside.
In a mixer fitted with paddle attachment, mix oil, sugar, and buttermilk until combined. Add eggs, food coloring, vinegar, vanilla and water and mix well. Add the dry ingredients a little bit at a time and mix on low, scraping down sides occasionally, and mix until just combined. Be sure not to over mix, or the batter will come out tough.
Line a 16-cup cupcake pan with paper liners, or prepare cake pan with baking spray, scoop the batter into the liners/pan and bake at 350 degrees F for 20 to 30 minutes or until the toothpick comes out clean. Let cool.

For the cream cheese frosting:

Whip the butter and cream cheese together in a mixer fitted with a paddle attachment until creamed. Gradually add powdered sugar to the mixture and scrape down the bowl as needed. Add the vanilla and mix until combined.
The frosting can be used right away, or stored in the refrigerator up to a week.
Frost cooled cupcakes/cake with the cream cheese frosting.

Wednesday, August 20, 2008

Mmmmm Cake!

Another thing to share in order to catch up! A co worker at work had a birthday, so I decided to make a cake. Everyone was pretty excited seeing as how a) they got cake and b) it was the first time since they all started working together that someone actually recognized that people had birthdays!

I decided to forgo my normal box cake mix when making SPECIAL cakes, so I used a recipe from my KitchenAid directions/cookbook. This was also my first attempt outside the world of fondant.
KitchenAid Easy White Cake
2 cups all-purpose flour
1 1/2 cups sugar
3 teaspoons baking powder
1/2 teaspoon salt
1/2 cup shortening
1 cup low-fat milk (I used skim and it was fine)
1 teaspoon vanilla
4 egg whites
Combine dry ingredients in mixer bowl. Add shortening, milk, and vanilla. Attach bowl and flat beater to mixer. Turn to speed 2 (low) and mix about one minute. Stop and scrape bowl. Add egg whites. Turn to speed 6 and beat about 1 minute or until smooth and fluffy.
Pour batter into two greased and floured 8 or 9 inch round baking pans (uh, I used square; big surprise). Bake at 350 degrees F for 30 to 35 minutes or until toothpick inserted in center comes out clean. Cool 10 minutes. Remove from pans. Cool completely on wire rack. Frost if desired.

IF DESIRED?! Well of course you must have MORE SUGAR in the form of frosting or icing :)I used Wilton's Buttercream Icing, but I think I used too much milk.


TaDa! My first attempt at a buttercream cake :)

Well, my next attempt is more cheesecake :)

LinkWithin

Blog Widget by LinkWithin